Tuesday, July 15, 2014

Omelet You In On A Secret

Eggs are a staple in any kitchen. They are often used in both sweet and savory dishes as components. In these applications they are an integral part of recipes, but not the star of the show. The egg normally gets the spotlight at breakfast. I'm not sure why eggs are mostly consumed in the morning. At our house, breakfast for dinner or lunch is always an option. Such as tonight, when I decided to take the challenge of making an omelet. Why is this even a challenge? Eggs and I have a mixed past. I have no issues cooking with eggs. However, I can't make a tasty scrambled egg to save my life. I am unsure about over easy eggs, and omelets are always half over cooked, half undercooked monstrosities. I will not eat a runny egg. Nope. I usually leave omelets to people who have the whole even cooking thing down pat. Just last week, as I was writing a post for my main blog, Hubby was watching a cooking show featuring eggs three ways. Fried, poached, and omelet. He immediately looked at me with that pleading look in his eyes. He saw the amazing product on screen, and he wanted it in his belly. If there is one thing I cannot resist, it is satisfying my husband's culinary fantasies. So I agreed to attempt the recipe. Unlike most omelets, this did not have a very hearty looking filling. Shallots, mushrooms, and Parmesan only? It sounded dubious. Where did they put the sausage and cheddar? But the man on the television claimed that the filling was light, but perfectly complemented the light and fluffy egg. When he pulled it out of the oven after only 5 minutes, I was in shock. His 4 egg omelet looked like it could feed three, when I would use 4 eggs for one omelet per person. Also, there was no milk. The prep was fussier, since you separated the eggs, and whipped the whites. I followed the recipe as written, and figured I would tweak it next round if it didn't work out. I can confirm, the only thing it needed was more Parmesan cheese.
I wish my bed was this fluffy!
The product was indeed fluffy and light. We could have easily fed a third person with only 4 eggs. I added some oven crisped apple wood smoked bacon and toast as sides, and I am plenty full. 

Fluffy Omelet

INGREDIENTS 
4 large eggs, separated 
2 tablespoon unsalted butter, melted
plus 1 tablespoon unsalted butter 
1/4 teaspoon salt 
1/4 teaspoon cream of tartar 
Mushroom filling 

INSTRUCTIONS 
1. Adjust oven rack to middle position and heat oven to 375 degrees. Whisk egg yolks, melted butter, and salt together in bowl. Place egg whites in bowl of stand mixer and sprinkle cream of tartar over surface. Fit stand mixer with whisk and whip egg whites on medium-low speed until foamy, 2 to 2½ minutes. Increase speed to medium-high and whip until stiff peaks just start to form, 2 to 3 minutes. Fold egg yolk mixture into egg whites until no white streaks remain. 2. Heat remaining 1 tablespoon butter in 12-inch ovensafe nonstick skillet over medium-high heat, swirling to coat bottom of pan. When butter foams, quickly add egg mixture, spreading into even layer with spatula. Remove pan from heat and gently sprinkle filling and Parmesan evenly over top of omelet. Transfer to oven and cook until center of omelet springs back when lightly pressed, 4½ minutes for slightly wet omelet and 5 minutes for dry omelet. 3. Run spatula around edges of omelet to loosen, shaking gently to release. Slide omelet onto cutting board and let stand for 30 seconds. Using spatula, fold omelet in half. Cut omelet in half crosswise and serve immediately.

Tip: make sure your cutting board is large enough for the whole omelet. My mistake caused it to crack before I could fold it. I didn't care, it still tasted yummy!

Mushroom Filling
sliced and diced
Gene Shallots!
INGREDIENTS 
1 teaspoon olive oil
1 shallot, sliced thin 
4 ounces white or cremini mushrooms, trimmed and chopped 
Salt and pepper 
1 teaspoon balsamic vinegar

 INSTRUCTIONS Heat oil in 12-inch nonstick skillet over medium-high heat until shimmering. Add shallot and cook until softened and starting to brown, about 2 minutes. Add mushrooms and 1/8 teaspoon salt and season with pepper to taste. Cook until liquid has evaporated and mushrooms begin to brown, 6 to 8 minutes. Transfer mixture to bowl and stir in vinegar.
Oops! Get a bigger cutting board!
I've got my eyes on you...
While slightly fussy, this dish will be gracing my kitchen often. I have no issues with making omelets now, and eventually plan to adapt the fillings for different tastes. I would mark this as a delicious victory in my book. No more monstrosities for me, only delicate fluffy clouds of egg from now on. I suppose I should learn to make myself some tasty scrambled eggs too, but then I would have no excuse to ask my husband to make them for me. I love him and his scrambled eggs.
Heavens to Murgatroyd!

Friday, May 4, 2012

Chicken "Laura-tine" Pasta Bake

This is an adapted recipe from my dear friend Laura. This dish is simple, tasty, and low fat, which happens to be my criteria for food these days.

Feeds a family of 4 x 2 , or the 3 people in my house x 2. ;-)
1 lb boneless skinless chicken breast
1 13.5 oz box of whole wheat rotini pasta
1 pkg of Kraft Parmesan Rosemary Garlic Seasoning Blends
1 brick of fat free cream cheese, cubed
1 can of 98% fat free cream of mushroom soup
1 cup of fat free shredded mozzarella cheese
1/8 cup low fat Parmesan
1 cup frozen chopped spinach, thawed and drained.
1/2 can of unseasoned artichoke hearts, drained, chopped finely
2 cups of water

Preheat Oven to 350 degrees. Set water to boil for pasta, cook pasta as per package directions, drain and set aside. Cube chicken breast in 1 inch pieces, spray skillet with non stick canola oil spray, add chicken, and cook over med heat till chicken is just cooked through. Remove chicken from skillet, set aside. Add cream of mushroom soup, to skillet with 1 cup of water, cube the cream cheese and add to pan. Stir with whisk until melted. Add seasoning blends packet to pan, whisk till combined. add additional water a little at at time to achieve desired thickness. Add spinach, and artichokes to pan and stir. Add in cooked chicken, combine, and heat through. Mix the sauce mix with the cooked and drained pasta. Spray an oven safe dish with cooking spray. Add pasta mixture to dish, sprinkle with the mozzarella cheese, and the low fat parmesan. Bake for 20- 25 minutes. Enjoy!

Learning How To Cook and Eat, Again

What happens to a self proclaimed "food worshiper" when she can no longer eat what ever she pleases? I saw it as a "Choose Your Own Adventure" type thing. I could decide to be really unhappy and upset with the cards I had been dealt, and curl up on the couch. Or I could storm the internet and comb through the stores in search of tasty and healthy food. I had a third choice, and that was to go about my business as if the doctors were crazy, but the thought of going through the excruciating pain again is a pretty good deterrent for me. Being diagnosed with acute pancreatitis was pretty scary, especially when they couldn't be even 10% sure what caused it in the first place. The triggers tend to be gall stones, or heavy alcohol usage. They never found stones, I am not a heavy drinker at all, nor do I have a family history of it. So they just said the cause was idiopathic, which really means "I dunno what happened". In a nut shell, I was told to stay away from fatty foods and alcohol. Losing the ability to drink alcohol wasn't devastating to me. I did enjoy a cocktail now and again, but I didn't lean on it for relaxing. It is what I did when I was hanging out with my family or friends. But being able to run to a favorite local restaurant and order up a greasy burger with a basket of fried pickles on the side, now that was heaven. But that heaven's gate is chained closed for the time being.

Adapting your way of eating and cooking from anything goes to low-fat-or-die, is pretty daunting. I mean I learned to cook like any other southern girl, with bacon, crisco, butter, and cheese. A dish that didn't contain one of these ingredients was pretty hard to come by in my world. Every cake, cookie, and casserole I have ever known is officially off limits to me. My first week home from the hospital was shaky. I wasn't able to eat regular meals yet, so I stuck to potato soup and jello. Frankly I was scared to eat anything that wasn't 100% fat free and bland in taste. I was already imagining dinners being so boring I would eventually hate cooking. My grocery list now said things like ground turkey, turkey bacon, fat free cheese, cyanide pills. Just kidding on that last part, but I was pretty scared for what I was assuming  was going to be the death of my culinary passions. My first glimmer of hope that all things delicious weren't lost was the first day I had a real meal. It had been a couple of weeks since I had been to my parent's house. I wanted to see my family outside of the hospital, and enjoy the company sans crappy medical setting. But where there is my family, there is food. Hamburgers and hot dogs was on the menu. Instead of being defeated, I decided to pack up a veggie burger, my special bread, my fat free cheese, and my special mayo. I would have a burger too, just not a beef one. But instead of eating the monster mash of veggies patty, my Daddy saved the day, and made me a turkey burger.

After almost 2 weeks of little to no food, that turkey burger was a delicious treat. I'm not exaggerating when I say, I was close to tears. It was real food, and I was eating it, and I didn't feel like I was being cheated. Now, I am not afraid of the ground turkey. I use it without flinching. My hopes of fried pickles will have to wait much longer sadly, but I found very low fat chocolate and peanut butter ice cream sandwiches to indulge in. There are good things out there. Word of mouth and labels are the best things to go by. Getting creative in the kitchen making low or no fat foods is a challenge. Where I would normally bust out the half and half, butter, and some good old stinky parmesean cheese to make an alfredo sauce, I knew that was no longer an option.  I took my friend Laura's recipe for spinach and artichoke pasta, and made a few key changes. The result was amazing. Not only did I succeed in making a low fat pasta dish, it was wonderful!

It's all trial and error in the fat free department. Not everything is going to taste good. Many times to make up for missing fat, they add in the salt and sugar, and that's not a better alternative. Also, some additives in these foods can do more harm than good. I've already warned about the dangers of Olean / Olestra, and because of that, fat free Pringles is off the menu. But Special K cracker chips, well they are better than potato chips if you ask me, little fat, and good to eat. Tonight I am making fat free brownies, in hopes that I can still get my dose of chocolate without triggering an attack. There are certain things a girl shouldn't live without, and chocolate is one of them. I like the ice cream well enough, but brownies trump ice cream for me. If the recipe makes me do a happy dance, I'll post it here. Wish me luck!

Tuesday, March 13, 2012

Spring Fling Mojitos


So, it’s been a while since I’ve posted a recipe here. Exactly a month actually, and I am sorry for that. Since this page is a secondary hobby, I let my work here go, that way I could keep up with my regularly scheduled blog.  So, now that things have found a rhythm, I can once again, get you on the road to learning What a Beebs Eats!

Spring is quickly approaching; in fact, our temps here have recently soared to the lower 80’s. It is the exact time of year that I generally put away the whiskey (for winter) for my occasional “adult beverage” on the weekends, and bring out the Bacardi (for summer).  I like change, and I LOVE to try new things, and last year I tried a cucumber mint mojito. I am normally no big fan of cucumber myself. I will eat it on a salad, but I never crave it. Until I had this drink that is.  It is refreshing, tasty, and totally unexpected. I know some are making that eww! gross! face, but don’t knock it till you try it. In fact, I may need to make sure I have the ingredients on hand this weekend.  I’m sure there are drink mixes you can buy in your local mega mart, but the home made versions are better. 


1 lime, quartered
2 sprigs fresh mint leaves
1 tablespoon white sugar
2 slices cucumber
6 cubes ice, or as needed
2 ounces white rum (such as Bacardi®)
4 fluid ounces club soda
Squeeze the lime quarters into a highball glass, and drop the limes into the glass. Add the mint leaves and sugar. Muddle well with the back of a spoon or with a muddler. Place the cucumber slices into the glass, and fill with ice cubes. Pour in the rum, then top off with club soda. Stir gently and serve.

*If you would prefer a sweeter version of this (I usually do) you can use Sprite or Sprite Zero in place of the club soda. Yum!!

Monday, February 13, 2012

Snickers by Chuckles

Pinterest is everyone's favorite addiction. I will admit, I too, love it. I don't usually announce my Pinterest inspired projects like some do. But there is one recipe I must tell you about! Homemade Snickers are what they are, and they are the best candy product I have ever made. I was so thoroughly disappointed that I forgot to add at least one to my lunch today I nearly turned around on my way to work. Yes, they are worth the mess, the time, and the cost, and the gas to get some! 

It makes quite a few, but they are so yummy, they go fast!


Homemade Snickers Bars


Bottom chocolate layer
1 1/4 cups milk chocolate chips
1/4 cup peanut butter

Thoroughly grease your  9×13 pan baking pan, or line with wax paper. Melt ingredients together in a saucepan or microwave, then pour into the baking dish and spread until even. Let cool and harden completely.


Nougat layer
1/4 cup unsalted butter
1 cup granulated sugar
1/4 cup evaporated milk
1 1/2 cups marshmallow fluff
1/4 cup peanut butter
1 1/2 cup salted peanuts chopped, roughly chopped
1 tsp vanilla extract
Melt butter in a saucepan over medium heat. Add in sugar and milk, stirring until dissolved and bring to a boil. Let cook for 5 minutes, stirring occasionally. Add in fluff, peanut butter and vanilla, stirring until smooth. Turn off heat and fold in peanuts, then pour over bottom chocolate layer. Let cool completely.


Caramel layer
1 14-ounce bag of caramels
1/4 cup whipping cream
Combine ingredients in a saucepan over low heat. Let melt, stirring occasionally, until smooth – this took about 10 minutes for me. Pour over nougat layer and let cool completely.


Top chocolate layer
1 1/4 cups milk chocolate chips
1/4 cup peanut butter
Melt ingredients together in a saucepan or microwave, then pour over caramel and spread until even. Let cool and harden completely.


 Tips: You can either buy one of the half-sheet aluminum cake pans at the grocery store, or line your pan with wax paper. That way, you can pop the entire square out and cut from there. My friend Laura gave the best suggestion, which was to put the pan in the freezer as you a preparing each layer. This insures that each layer is set, before the next, and it goes faster. Keep them in the fridge to prevent total meltdown!

PS. My dad used to call me Chuckles when I was a kid, because I was as goofy back then, as I am now! 

Friday, February 3, 2012

Superbad Superbowl

It's Superbowl weekend, and my recipe book says it is time to cook hot wings and drench things in cheese! We don't even watch the game in my house, if we do, it is for the commercials alone, and then to boo and hiss at the crappy half time show. Last year was Black Eyed Peas wasn't it? Don't get me wrong, I love many of their songs, but yikes guys. Epic fail! We were watching when Justin Timberlake and Janet Jackson pulled the infamous "Wardrobe Malfunction" incident. I didn't see anything, did you? But beyond hilarious commercials and lackluster performances, the Superbowl is the great time of year to break out the 45 layer dip, and clog your arteries with delectable savory treats. But if you are anything like me, then you will crave something sweet after that salty goodness. Most people don't think of adding a sweet to the football buffet table, but I found something that few people I know would pass up. No need for chocolates, or heavy cheesecakes! How about you make something traditional, with a twist?

Pineapple Upside-down Cupcakes!!

Come to me, luscious well portioned goodness...

Topping

8 tablespoon(s) (1 stick) unsalted butter, melted 
3/4 cup(s) light brown sugar, firmly packed 
1 can(s) (20-oz.) crushed pineapple, drained, juice reserved 
12  maraschino cherries, drained and halved

Cupcakes

1 box(es) (18.25-oz.) yellow cake mix 
1 cup(s) sour cream 
1/2 cup(s) pineapple juice, reserved from crushed pineapple 
1/3 cup(s) vegetable oil 
4 large eggs 
1 teaspoon(s) vanilla extract

Directions

  1. Place a rack in the center of oven and preheat to 350ºF. Lightly mist 24 cupcake cups with cooking spray and dust with flour.
  2. For the topping, measure 1 tsp. of melted butter into each cupcake cup. Sprinkle 1 heaping teaspoon brown sugar on top of the butter. Spread about 1 Tbsp. pineapple on top of the sugar and place a maraschino cherry half in the center of the pineapple, pushing it down so the cherry touches the pan. Set pans aside.
  3. For the cupcakes, blend cake mix, sour cream, pineapple juice, oil, eggs and vanilla in a large bowl with an electric mixer on low speed for 30 seconds; scrape down the sides of the bowl with a rubber spatula. Increase the mixer speed to medium and beat for 2 minutes more, or until batter is thick and smooth, scraping bowl again if needed. Spoon 1⁄3 cup batter onto the topping in each cupcake cup.
  4. Bake until cakes are golden and spring back when lightly pressed with your finger, 18 to 20 minutes. Immediately run a knife around the edges of the cupcakes to loosen. Invert onto a platter and cool for at least 15 minutes before serving. 


Thursday, December 29, 2011

What a Beebs Cooks and Eats!


Please enjoy the following recipie from my Husband, El Grande Beebs! Beebs' Own Guacamole recipe available upon request!!

Migas Con Fajitas de El Grande Beebs

This is a very large pan of epic breakfast goodness.
The following recipe is not Mexican or American, it is exclusively Tex-mex. Living so close to the Texas/ Mexico border, we have grown up with our forks on both sides of the Rio Grande. Migas translated in English means crumbs. This recipe utilizes left overs, which makes it smart, and delicious, just like El Grande Beebs. So break out the sombreros, and get ready for a fiesta in your boca (mouth).

1/2 bag of left over corn tortilla chips (NOT STALE!!)
3/4 stick of butter
2 tbs dried onion
1 tbs minced garlic
1 dozen eggs
1/2 cup half and half
1 1/4 cup of your favorite salsa (Pace Picante works well too, and no need to get a rope)
12oz package of shredded cheddar and monterrey jack cheese
Leftover beef or chicken fajitas

Step 1:
Heat large skillet to med low, melt your butter and add the onion and garlic. Cook until onions are slightly browning. Lightly crush corn chips, and add to the butter mixture. Toast to a golden brown perfection. Add leftover fajita meat to a pan, sprinkle with water, and stir occasionally on low temp.
Reheat your fajitas and make those chips toasty brown
Step 2:

Whisk together the eggs and half an half thoroughly. Add salt and pepper as you please, but don't forget the chips are salty. Add egg mixture to the toasted chips, and make sure to distribute the chips in the eggs.
eggs, milk, whisk get to it!

Step 3:
When the eggs are almost completely done, add your salsa and lightly fold into migas. Add your cheese on top and serve
So very close to done, but something is missing.... 

Step 4:
Serve with Beebs' Own Guacamole, and sour cream. Don't forget the tortillas, and divy up the fajita meat.

You can't handle the deliciousness that is shown in this picture. I know. It's okay. 

Adios from The House of Beebs, and a big thanks to my special guest chef, and photographer, El Grande Beebs!  

Thursday, December 22, 2011

A Peanut Butter and Chocolate Kind Of Love

Possibly two of my favorite flavors in the world are peanut butter, and chocolate.  I have been known when desperate or just feeling reckless to eat teaspoons of peanut butter drenched in Hershey syrup, with no ceremony.  I am a total hoss, and recommend you not do as I do. But if you made these cookies, it is almost like doing the same thing, and way more respectable.  Remember that! (If you eat it in cookie form, it is more respectable.) Peanut butter blossoms are yummy, easy to make, and look pretty on a plate.  This cookie walks a fine line between candy and cookie, and unless you are allergic to peanuts, it is the bee’s knees. In total honesty, I don’t make these for me; I make them for my almost 29 year old “baby” sister. If it wasn’t for her, my life would be a 1000 times less funny and satisfying. Not only is she my best friend, but she is the mother to my baby boy, and she is utterly selfless. So I make these every year just for her.  Merry Christmas from The House of Beebs!!

48 HERSHEY'S KISSES Brand Milk Chocolates
1/2 cup shortening
3/4 cup REESE'S Creamy Peanut Butter
1/3 cup granulated sugar
1/3 cup packed light brown sugar
1 egg
2 tablespoons milk
1 teaspoon vanilla extract
1-1/2 cups all-purpose flour
1 teaspoon baking soda
1/2 teaspoon salt
Granulated sugar

.) Heat oven to 375°F. Remove wrappers from chocolates.

.) Beat shortening and peanut butter in large bowl until well blended. Add 1/3 cup granulated sugar and brown sugar; beat until fluffy. Add egg, milk and vanilla; beat well. Stir together flour, baking soda and salt; gradually beat into peanut butter mixture.

.) Shape dough into 1-inch balls. Roll in granulated sugar; place on ungreased cookie sheet.

.) Bake 8 to 10 minutes or until lightly browned. Immediately press a chocolate into center of each
cookie; cookie will crack around edges. Remove from cookie sheet to wire rack. Cool completely.
About 4 dozen cookies.

Friday, December 16, 2011

The Oddest Christmas Ever!

Christmas is due in less than 9 days, and it is time for those who make an epic meal on Christmas or Christmas Eve to start scrambling for the store to pick up the turkey or ham and trimmings. My family is pretty traditional in regards to the feast. We usually do ham and potatoes au-gratin, green beans, stuffing, and rutabaga. What is a rutabaga?? It is what you get when you try to cross a cabbage and a turnip. It is popular all over the world but it is most often called a Swedish Christmas tradition. Now how my Irish Italian mother picked up on a Swedish tradition I will never know. (She is special like that.) But as a kid, I rejected the veggie and it's odd name. My parents were great about not forcing food on us as kids, if we didn't want to eat it, we simply didn't have to. But as an adult, my tastes have changed considerably. I now look forward to the unusual treat with my Christmas dinner. You may eat this twice a week, but we don't and I find it something special to look forward to.
Ugly, yet tasty...
So my challenge to you is to find something out of the ordinary to make a part of your Christmas feast. It doesn't have to be anything elaborate, it could be a simple as preparing a veggie you or your family would normally walk past as if it wasn't there or adding cajun spices to your turkey and stuffing it with boudin. This is how traditions are made. Your kids won't have the slightest clue why you added dried cherries to the stuffing they will just know that omg that Christmas stuffing is the best!  No one says you have to completely stray from the norm, just make it a little more special. Don't be scared!

This year we are changing up our Christmas Eve program. Usually, we party at Mom and Daddy's house having drinks with family and friends that stop by here and there. But this year we have opted for a quieter version of the event at my sister's house. We may not be hosting the usual gang, but we are going to make some finger foods, drink some whiskey, and possibly enjoy a fire. I will decorate a gingerbread pineapple with the kids, and enjoy the grab bag of rednecks, geeks, and freaks I love most in this world (my family). 

Yes, they make these, and yes I bought one.
 Doing something special and different is what makes memories, and after all the wrapping paper settles, and the last bit of figgy pudding is shoved down our gullets, that is all you have left, the memories. Go Enjoy!

Thursday, December 8, 2011

Toffee Talk

The most impressive gifts to give are not the most expensive. I honestly think that a basket filled with homemade treats is almost as good as getting that diamond you have been after for awhile. While, I might be exaggerating slightly, (seriously guys get her that diamond!) Homemade toffee is just below that. It is so ridiculously easy and tasty, you will kick yourself for not making it before. People are extremely impressed when you bring them boxes of homemade toffee. This simple 5 ingredient recipe is so delicious and decadent, you will be crowned Christmas Queen or King for making it. Bag it up nicely, and give it out to co workers, and extended family. Everyone gets something yummy and you get +5 admiration from everyone.

You made this?!


2 cups butter
2 cups white sugar
1/4 teaspoon salt
2 cups semisweet chocolate chips
1 cup finely chopped almonds (or try crushed candy cane, it looks so festive!)


1.) In a large heavy bottomed saucepan, combine the butter, sugar and salt. Cook over medium heat, stirring until the butter is melted. Allow to come to a boil, and cook until the mixture becomes a dark amber color, and the temperature has reached 285 degrees F (137 degrees C). Stir occasionally.
 
2.) While the toffee is cooking, cover a large baking sheet with aluminum foil or parchment paper.
As soon as the toffee reaches the proper temperature, pour it out onto the prepared baking sheet. 

3.) Sprinkle the chocolate over the top, and let it set for a minute or two to soften. Spread the chocolate into a thin even layer once it is melted. 

4.) Sprinkle the nuts over the chocolate, and press in slightly. Putting a plastic bag over your hand will minimize the mess. 

5.) Place the toffee in the refrigerator to chill until set. Break into pieces, and store in an airtight container.


Thursday, December 1, 2011

Cookies Rule and Cookie Rules

Cookies. They are a portable party. Everyone loves them, and if someone says they don't they are LYING. (they just haven't met the right cookie yet!) Baked from scratch cookies are the apex of the hierarchy in cookiedom, but just below are the slice and bakes, and the dry mixes. These two make you exert very little energy, and can still come out fabulous, but at the very bottom of all is prepackaged store bought cookies. Unless you are using junk food cookies for an ingredient in a recipe,  save the energy you spent on opening the package on picking your nose. No, it isn't the thought that counts. Now I realize there are certain times you can't do freshly baked goods. For instance my nephew's school tells parents that all baked goods must come from the store in a sealed package, nothing homemade. I find this both gross, and sad. If you aren't totally understanding what I am saying here, try this:

Unlike the food pyramid you always see, the bottom of my diagram is bad, and the top is yummy delishisness.
You can't top the hard work of someone mixing and measuring the flour, eggs, and what-not. Those preservative laden easy-open packaged imposters try to trick you into thinking they are good and fresh, but that is bull, and you know it! If you are sure that mixing and measuring is not your thing, or even looking to save time, but want to come out looking like a hero, try the pre-made dough, or even the dry cookie mixes found in the baking aisle. You can make these easy-does-it cookies with little effort, and can even add to them, morphing them from okay to "Wow! you made this?!" However...

Baking is a delicate, and attention demanding process. Don't try to rush your product, or forget about it, because you will end up disappointed, and hungry. Everyone that cooks has issues with a product coming out just right. I have over cooked plenty of cookies, and tend to still do that when I am in the kitchen at this time of year. It is easy to get distracted when you are doing so many things at once. I have a few tricks that help me put my cookie care packages together with pride. I make no less than 5 different cookies every year, and that doesn't include the fudge, toffee and truffles I usually make as well. I have much to keep me busy, and my rules make my mountain of self inflicted work look effortless.

1. Some things can be corrected or substituted, if you know what you are doing. But if the recipe calls for white granulated sugar, and all you have is white powdered sugar, DO NOT SUBSTITUTE!!! The only exception is the replacement of shorting for butter. When at all possible, use real butter. You and your taste-buds will thank me. You are welcome.

2. Use your timer. Buy a timer. Borrow a timer. Make sure it is something that will get your attention, just in case you get caught napping in between batches. (!!you should never sleep with the oven on!!) Your recipes will always give you a time range after the oven temp. Bake at 350 for 12-15 minutes. What are you supposed to do with this!? Do as I do. I set the timer for the lowest time. Come back and judge your product at the sound of the alarm, and either pull them, or reset for another couple minutes. Hover over the oven like a mamma bird. Going from done to burnt happens in a blink.

3. Parchment paper promotes easy clean up and even baking. Get some. Right now. I'll wait.

4. Your oven has a mind of it's own. I don't care if you can roast a rack of lamb in it like America's Top Chef. When you are baking, you get to see all of your oven's personality traits. You don't discover them until you put your fist batch in, and you start noticing that one side is browning, and the other is half baked. Your oven has a hot spot, isn't that adorable? You rotate the sheet so the under cooked side is getting the hot spot and pat your stove with a loving look in your eye. Possibly you set your oven temp, and it preheats as it should, and you pop in your sheets of currently gloppy goodness. You set your timer like I told you to, and came back to burnt product! WTF!? Don't always trust your oven's dial. It is like a woman, but instead of lying about it's weight it lies about it's temp. Bump your temp down 25 degrees, and wait 10 min to put in the next batch. Now this round, time it to the bottom of your time range given, but check those cookies every few min. Just to see how they are getting along. When they are looking good, take note of the time, and set your next batch to the beat of that tune. You are looking like a kitchen genius my friend.

5. I mentioned butter in rule #1. Using it in your baked goods shows you really care about how your product tastes. But there are things you need to do to make sure that your product doesn't fail you. Butter is usually room temp @ mixing time. So that leads to a batter that will spread like lava from a slowly moving volcano. Before you know it, your cookie sheet is one big cookie.  If that happens, say you meant to do that, and ice it like a cake. Add sprinkles, and viola! Cookie cake! But to prevent that from happening, put your raw dough in the fridge for 30 min to an hour. I know that seems like a long time, but hot kitchen + warm dough = hot mess. Prevent the melt down with some chill time. This goes for the cookie sheets too. No don't put them in the fridge, but make sure you aren't adding the dough to hot sheets. This produces the same issues. Allow ample time for cooling between batches.


6. How to make a chewy product: This part is a bit of luck, and a bit of savvy. If you are looking for chewy, pull the product from the oven a min or so early, and cool on wire racks ASAP. But beware, over mixing in the bowl can make any cookie come out crunchy. A gentile touch, and a keen eye. It's science!!

 7. Have fun.

These are but a few of my secrets of cookie conquering. You will never catch me making cookie cuts outs in my kitchen. I buy the pre-made ones and decorate them if I so desire. It is the same with gingerbread houses. I am more for enjoying the act of decorating and spending time with the kids, than making gingerbread walls and royal icing. Buy a kit, save the time for deciding on what candy goes on the roof. No one said if you aren't covered from head to toe in flour you didn't do it right. It could be as simple as breaking off a sugar cookie dough square and rolling it in red and green sugar before you bake it. It isn't the cost or the time, but the effort and love you put into it that makes it special. Go forth and bake cookies people, if for no one but yourself.

Tuesday, November 29, 2011

The Jack Of All Cookies

 I have a secret to share with you all. When I make up my cookie platters and gift boxes every year....


Don't be mad okay???


I use one cookie base recipe and add different flavors to it. Horrible!!!! I know! It only gets worse... I make them ahead of time into cookie logs, freeze them, and slice and bake when I need them! Oh the shame! Although I feel much better about telling my secret. Plus, now that you know about it, you can cheat with me, and then I won't feel so bad. 

I start out with a cookie base that is simple and easy. The recipe below is similar to the one I use, but mine is actually from my Aunt Diana, and some things should stay in the family, ya know?


Brown Sugar Cookies

1 c. butter
2 eggs
1 1/2 tsp. baking soda
2 c. brown sugar
1/2 c. warm water
1 tsp. salt
4 c. flour
1 tsp. vanilla


Now we get to the fun part:


Go to you baking isle, and check out all the tempting tidbits and yummy morsels just begging to be added to a cookie batter. I have seen and used butterscotch, toffee, dark chocolate, peppermint bits, peanut butter chips, mint chocolate chips, mini chips, and M&M's to name a few. Don't forget to get some almonds, walnuts, or pecans, and then swing by the dried fruits and pick up some Craisins,  and what ever else you fancy. Make a new batch of dough for each flavor you choose to make. If you don't want to go out and get any of these chips and bits? Make up a bowl of cinnamon and sugar and roll balls of your dough in it before you bake. This will produce what is known as "snickerdoodles". If you want to bake right away, make sure to put your dough in the fridge for at least an 1/2 hour to firm it up. (Cooking with butter can be tricky like that)

Bake at 350 degrees for 8-10 minutes. Cool on a wire rack, and bask in the glory of delicious cookie love. 

My next post will have all my helpful cookie making hints in it. Be sure to look out for it, especially if you can never figure out how to make chewy cookies instead of making those frisbees you cringe at sharing. Been there, done that, writing the blog about it.

Tuesday, November 22, 2011

It Is Called A Food-gasm, Have one.

Thanksgiving is the mother of all food holidays. Yes, yes, it is also about giving thanks, and having your family around you, but it is really more about the roasted or fried poultry delicacy and all the trimmings. We spend so much money on the big day, which is nothing but an eat fest. Not only do you serve a meal with more side dishes than should be legally allowed, you serve a variety of desserts too. Not to mention the left overs. So, With a day full of food, and more food, I try my best to focus my attention on the centerpiece of the day which is the bird. I prefer ham really, but there is something undeniably satisfying about cooking a large bird that not only looks good, but tastes great too. I tend to focus more on the taste, because, the turkey only really looks good for the 10 min before carving while the meat rests.

Yummy , but not so beautiful anymore.

I tend to lean towards tradition with my bird, and do as my mother does. She cooks the turkey in a blush wine, with a bit of salt, and poultry seasoning.  I get creative and made an herb butter spread that I applied to the entire turkey inside and outside the skin, not to mention put onions and garlic in the cavity. Mmm! I like feeling up my turkeys while lathering them in butter in the early morning hours. But all that turkey lovin' aside, lets get to the important subject of what you can do to take your turkey from ordinary, to legendary. Now, I must say, I am just giving ideas here, I haven't actually tried these methods of seasoning myself, but I am sure there are crazy people out there like me, with an extra turkey to go all experimental on.

1. Blackened Turkey. I love blackened anything so I could imagine a whole turkey coated in the Cajun spice of the gods. Inject that sucker with some of the seasoning mixed with butter, and call me over when it is ready!

2. Honey Roasted. Honey is liquid heaven. Drench your celebratory bird in honey and roast that sucker to perfection. I bet a fight breaks out at your table over the skin alone. Post pictures please!

3. Crouching Turkey, Hidden Flavor. Peel a bunch of garlic cloves. Tuck them between the skin of your bird and the meat. Do this all over the entire bird. Salt and pepper your bird, drizzle some olive oil on it, give it a massage, and cook it. When you pull the main attraction from the oven, the cloves should have dissolved, if not push on them and they should disintegrate. If that doesn't work, you fail. Throw the whole thing out and try again tomorrow. (not really)

4. Garbage Pot Turkey. You have the turkey, you have a bunch of stuff in your fridge, and you have NO CLUE what to do with it all. Well, do as I do. Open your fridge, and look around. Pick something you think may work well with Turkey. I open my fridge, I find onion, garlic, butter, beer, apples, and and orange. Score! I take the orange, squeeze the juice in a bowl, set aside. Chop the apples, onion and garlic. Insert inside poultry. Mix a hodge-podge of spices with the butter, and get under that skin. Paint your bird like a Picasso with the orange juice with pulp, sprinkle some seasoning on the outside. Put in pan, pour a beer in the bottom, and set to cook. Finally, don't forget to mention me in your "Cook of the Year" acceptance speech.

I hope I have given you some idea of how to amp up turkey day for you and your guests. No matter how you cook your turkey, or tofurkey this year, above all, have fun, and give thanks that you have all that you have. Happy Thanksgiving y'all!


Thursday, November 17, 2011

Broccoli and Cheese, If You Please Soup

Canned soup is great when you are sick, and you need sustenance. Or just don't feel like making a mess in your kitchen. But when the weather is chilly, and your stove is clean, soup is the perfect cure for both problems. The following recipe isn't the exact same one my mom used to make, but it is close, plus it is budget and time friendly. Add a cheater chicken, and some garlic bread and you have a yummy delish meal that will be a go-to cold weather dish.


1/2 cup butter
1 onion, chopped
1 (16 ounce) package frozen chopped broccoli
4 (14.5 ounce) cans chicken broth
1 (1 pound) loaf processed cheese food, cubed
2 cups milk
1 tablespoon garlic powder
2/3 cup cornstarch
1 cup water
1.) In a stockpot, melt butter over medium heat. Cook onion in butter until softened. Stir in broccoli, and cover with chicken broth. Simmer until broccoli is tender, 10 to 15 minutes. 
2.) Reduce heat, and stir in cheese cubes until melted. Mix in milk and garlic powder. 
3.) In a small bowl, stir cornstarch into water until dissolved. Stir into soup; cook, stirring frequently, until thick.

Monday, November 14, 2011

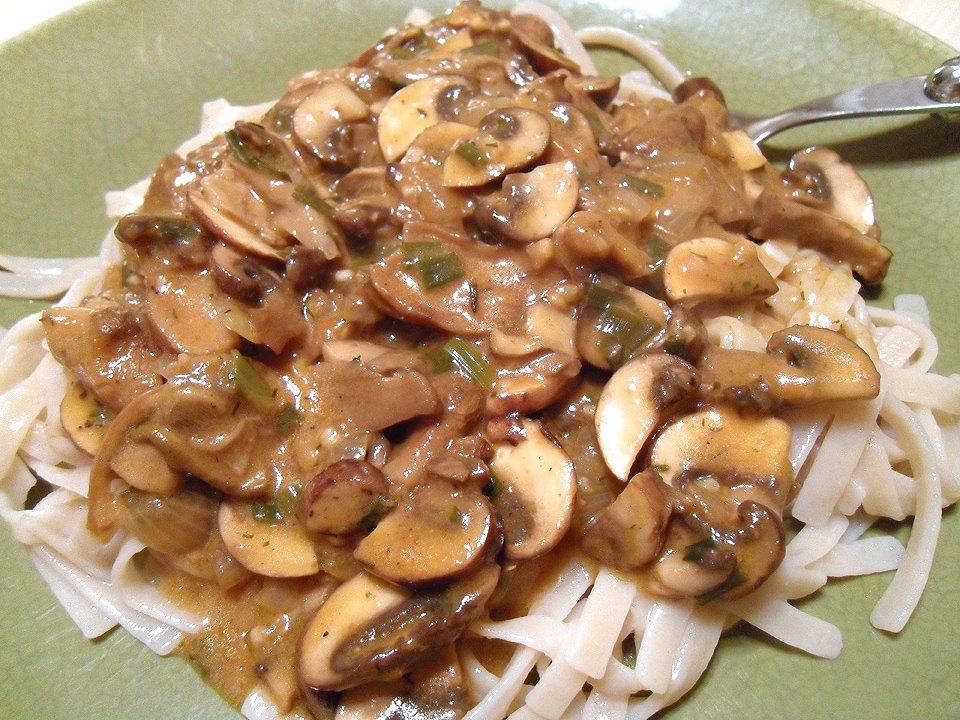
Mushroom Stroganoff For The Meatless

 We eat meat in my family, lots and lots of red meat, chicken, and pork. We are obviously protein people. But, occasionally we do run across a friend or acquaintance that is anti meat. You know them as Vegetarians. Veggies are great, but I have never had to stop and consider all the things that we cook with that already have chicken and beef flavoring, or something similar. Tofu is outta bounds for me, and I will tolerate a chunk or two in some hot and sour soup, but Tofu dogs?? No. Not ever. Gah!!! So upon hearing that I would have a vegetarian joining my table this past weekend, I panicked, and then ran to my good ole red and white checkered cook book. Sure I could open some cans of veggies, and call free for all, but we don't treat guests like that. Only the family. I found a perfect answer to my "wtf do I make?" dilemma. It is called mushroom stroganoff, and it is pretty darn tasty for a meatless dish. Although, my first thought upon tasting the final product was "this would be really tasty with ground beef!" Sadly, our veggie loving guest couldn't make it after all, and I had a huge pot of it left over. So I cut up leftover steak and added it to the pasta, and served it for dinner last night. It was amazing!


1/4 cup butter
2 cloves garlic, finely chopped
1 large onion, sliced and separated into rings
1 pound assorted mushrooms (such as button, crimini, oyster and portabella), sliced
1 tablespoon chopped fresh parsley
1/2 teaspoon salt 
 
1 crushed vegetable bullion cube
1 cup vegetable broth
2 tablespoons all-purpose flour
1 cup sour cream
6 cups hot cooked egg noodles or linguini

1.) Melt butter in 12-inch skillet over medium-high heat. Cook garlic, onion and mushrooms in margarine, stirring occasionally, until vegetables are tender. Stir in 1 tablespoon parsley and salt.

2.) Mix broth and flour; stir into mushroom mixture. sprinkle in crushed bullion cube Heat to boiling. Boil, stirring constantly, until thickened; reduce heat to low.

3 .)Stir in sour cream (do not boil). Serve over noodles. Sprinkle with parsley.
 

Friday, November 11, 2011

Cheater Chicken: What You Have Been Missing

You have seen this before if you have ever been to any store that has a deli. They are popular, and tasty. But they have a darker, more sensual side to their existence. Normally, they come home with you, and go nicely with a side of mash and gravy. But when you aren't looking, they are flashing their juicy goodness at your recipe book, like the naughty little cheater chickens they are. Why exactly do I call it cheater chicken? Because unlike good little "Suzie Homemakers" that can strangle, pluck and boil a fresh chicken for a recipe, (or even just open a package and dump it in water), I can use the cheater and avoid the boiling mess and get to de-boning and chopping immediately. The flavor is also included with the chicken. Look Ma! No Seasoning! Now there are things that you still want to boil for, such as soups and stews. You can use the cheater, but you can't beat homemade broth.

But for the sake of my point, (I will eventually make one) let's say one night you are feeling like enchiladas, but you are in dire need of a siesta. That means you want enchiladas, but you are tired. Instead of going out to the coop (or freezer) for your main meat, scoop up a cheater. Cut that cheater up, and make cheater sauce (that is another discussion for another time), throw in tortillas, and cheese, and OLE! You have in your possession one sexy pan of enchiladas ready for your  enjoyment. Same goes for most chicken dishes. Add a cheater to a pan of broccoli cheese and rice casserole, or put it on a salad and call it "chef sal-lad". There are many many things I can think of to do with a cheater, other than eating it right from the package.

I encourage you to cheat in the kitchen when you feel like it. I don't care if you opened a package and dumped it in boiling water, you are cooking. You have to enjoy it to get good at it. If you are stuck in a kitchen grumbling about a long process, then look for ways to make it easier. I pride myself on getting meals prepped and on the table in less than an hour. But I can't always do that without my cheats. Above all, have fun, because if it is not fun, then it is a chore. Plus you cook they clean! (or at least that is how it is supposed to work)